It’s been my dream to have parquet flooring long before we moved into our current house. Back in 2010, when we moved into our previous home, one of the very first projects we took on was laying new pine flooring in our living room. At that time, I loved the look of dark stained floors and so that’s what we did. Fast forward a few years after that and I realised I’d created a bit of a rod for my own back because I wanted the flooring to be consistent throughout the house and so that meant nearly every floor we did after that was also dark stained pine flooring. Crap.
Don’t get me wrong – it was fine. It’s just that I’d changed my mind a few years later but because I didn’t want different flooring in different rooms, I just continued with it until we moved out. In fact, the very last areas we did was the hallway and the bedroom. Again, in dark stained pine. I swore to myself that given the chance again, I’d go with something that was less trendy and more classic. I’d fallen head-over-heels in love with the look of parquet and I knew I’d accept nothing less when we finally moved into our next – and forever – home.
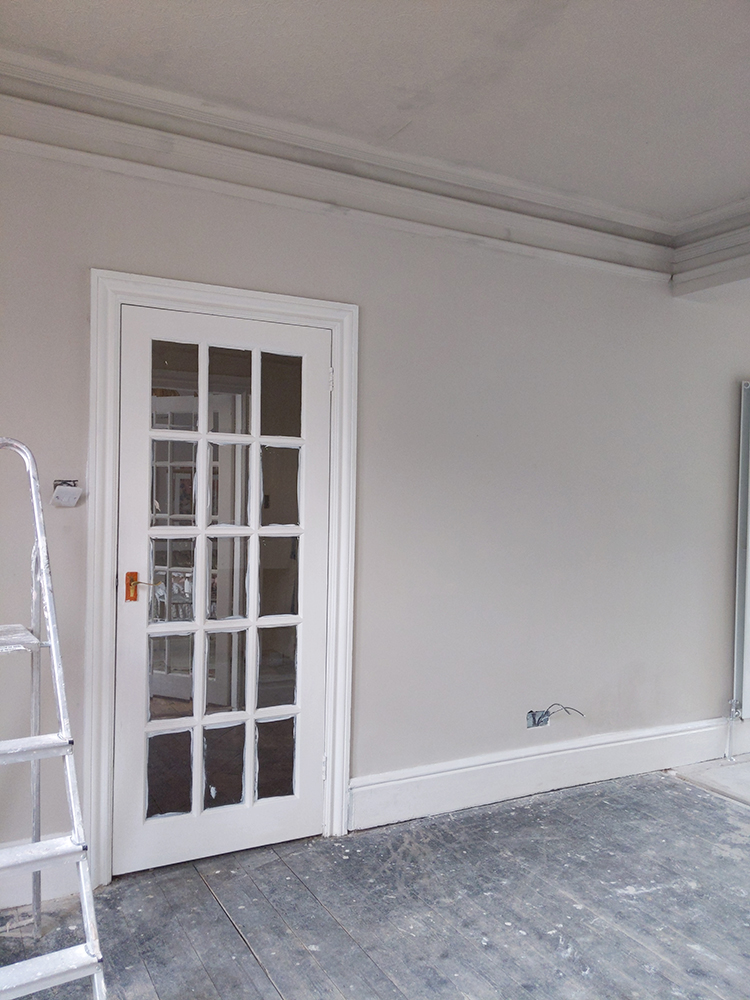
When we viewed this property, the first thing I noticed when I walked into the door was the beautiful original parquet throughout the hallway. I already had a feeling that this house was ‘The One’ but that kind of sealed the deal for me. And while I had hoped at the time that more parquet was hiding beneath the carpets in the other rooms, sadly that was not the case. Still, I had my taste of it and wanted more!
So all that just to say that it’s a bit of a pinch-me moment to finally have these floors in my home. After years of putting down different kinds of flooring – from pine to tiles to slate – it was time to graduate to laying parquet. I had a lot of confidence in Wayne’s ability, of course, but this was likely to be a new challenge. I knew that professional installers charged a very hefty fee to install parquet but looking at various YouTube videos and familiarising ourselves with the process, it seemed to be pretty easily within our wheelhouse. And genuinely, I believe that most any fairly competent DIYer can do the same.
Pin this for later!!
Why We Chose Engineered Parquet Flooring
After quite a bit of research, engineered flooring was my choice as I wanted something hard-wearing which was suitable for use in a kitchen. It’s a bit more durable than solid wood, not reacting to heat or humidity in the same way real wood does which means it’s appropriate to use in a kitchen. And within the structured layers of engineered flooring is a 4mm real wood layer on top which means it looks indistinguishable from solid wood flooring and can be sanded at least a number of times if required. After discussions with my contractor, we opted to forgo underfloor heating but we could have easily used it with this product.
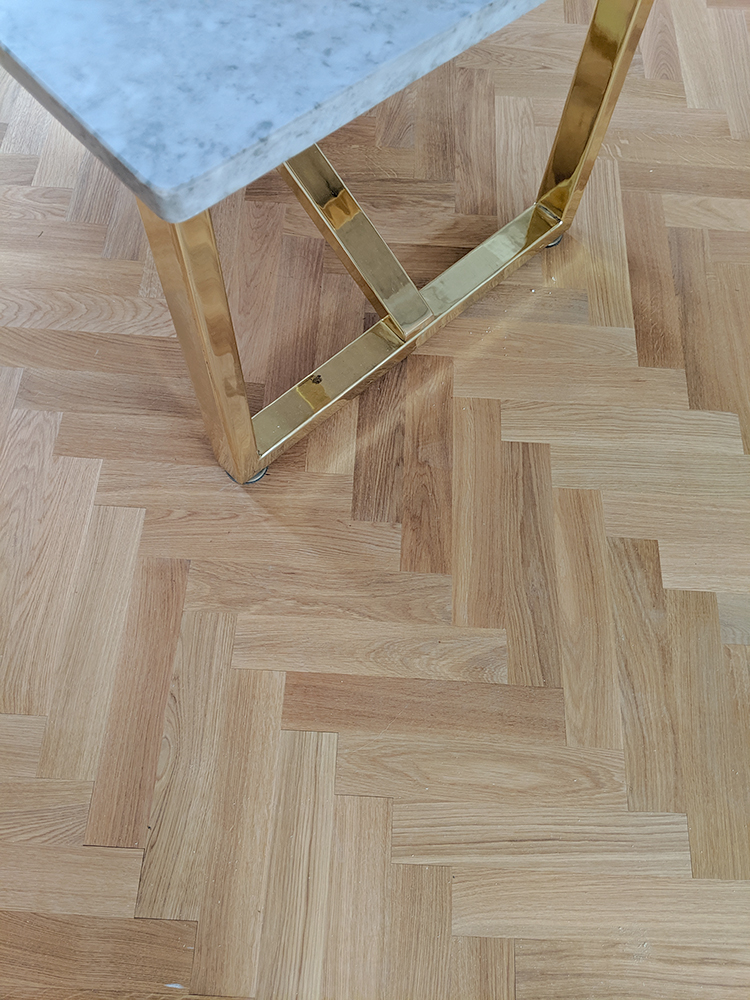
Now there are a lot of different kinds of parquet flooring so I can only share what we did with the materials that we had. I’m working with Luxury Flooring on this project who supplied Engineered Wood Flooring to us at a discount in exchange for sharing our project with you. The style I chose was the 70mm X 350mm Prime Oiled Oak Herringbone Engineered Wood Flooring which is 11mm total thickness including a 4mm layer of prime oak. I chose this specific size because it most closely matched the size of the original parquet in our adjoining hallway.
Luxury Flooring also provides a 25-year warranty on our floors. That’s better than many of the really high-end flooring manufacturers that I’d looked at and – considering the cost was nearly half the price – the quality was easily comparable. They had great reviews on Trust Pilot as well and provide incredible customer service. In fact, I had already decided I was going to buy their products so when they offered to work together on this one, it was genuinely a no-brainer!
**UPDATE SEPTEMBER 2020 – A year on, I wanted to give you a little update on what I felt we could have improved so you’ll see these notes in my post in asterisks like this!**
So here’s how we completed laying the parquet in our space…
Step 1: Start with a Level Floor
We chose the fairly basic 2mm acoustic foam underlay but we also purchased fibreboard separately to lay on top – I’ll get to why in a moment! Luxury Flooring has a huge range of different kinds of underlay on the website (along with a myriad of choices of flooring), depending on your requirements so it’s worth checking out the website or speaking to one of their representatives for the best advice on your particular subflooring. We started with a concrete subfloor in the extension part of the space and the original wood flooring in the dining room.
Thankfully, because we had our contractor lay the concrete flooring in the kitchen, we knew it was already level. Luckily, the original pine flooring in the dining room was level as well. As a side note, our previous home was Edwardian (built in 1906) and it was wonky as hell. I mean, every floor and every wall and every ceiling was crooked. This house is Victorian (built in 1896) and luckily, we have less wonkiness in this house and the flooring in both the dining room and living room are surprisingly level. So this saved us a job.
However, if your floors aren’t level, you absolutely need to take care of this first. We’d prepared ourselves for the worst so you can imagine our surprise when we realised we didn’t have much prep to do here aside from removing a few errant nails and nailing some of the boards more securely (there may have been whooping and high-fiving going on). You may need to pour self-levelling compound on your floors before you start to ensure they are completely level. Otherwise, you’re going to have squeaky floors and large gaps between the planks.
Step 2: Underlay
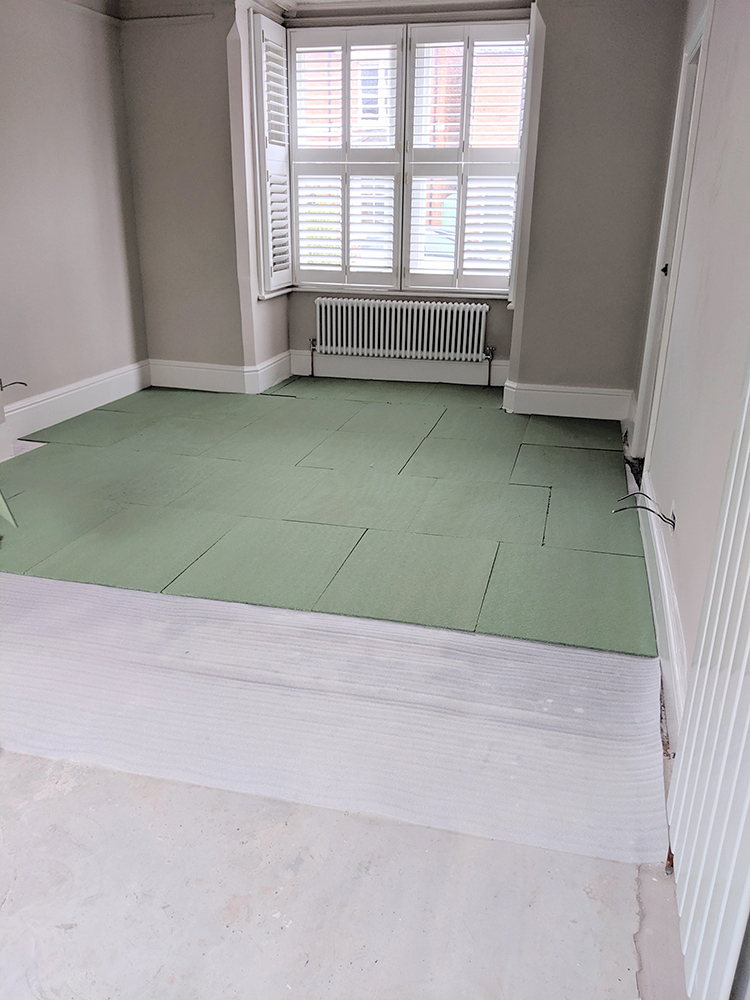
Your second step is to choose your underlay. Now, the flooring in the hallway was higher than the flooring in the dining room (and incidentally the living room on the opposite side). I’m not sure why this is the case but we had a difference of 21mm between the floors and so we decided to create an additional layer of underlay. The 2mm underlay was laid first and then we positioned 7mm fibreboard on top.
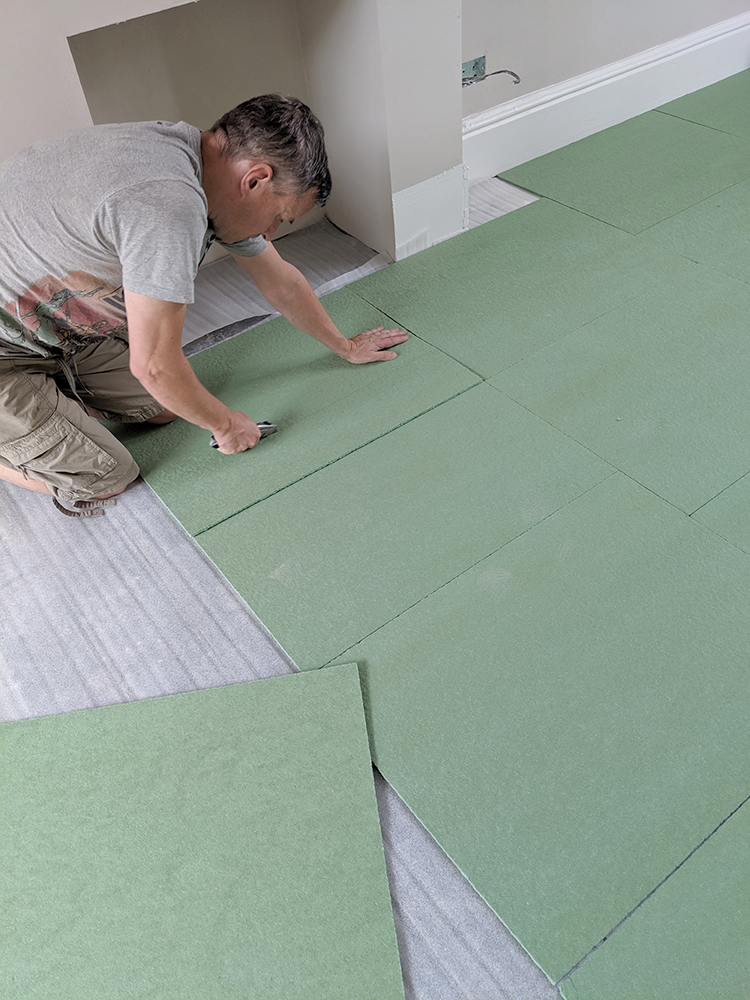
This not only allowed for the floors to be totally level with the hallway (honestly, how many times can I say ‘level’ in one blog post?!) but it also increased how much insulation was under our floors – a necessity for us in an old house! Of course, the underlay you use will vary depending on what you’re starting with and whether you’re planning on using underfloor heating. Again, I’m just sharing our method so this is what we used!
Step 3: Find Your Middle Point
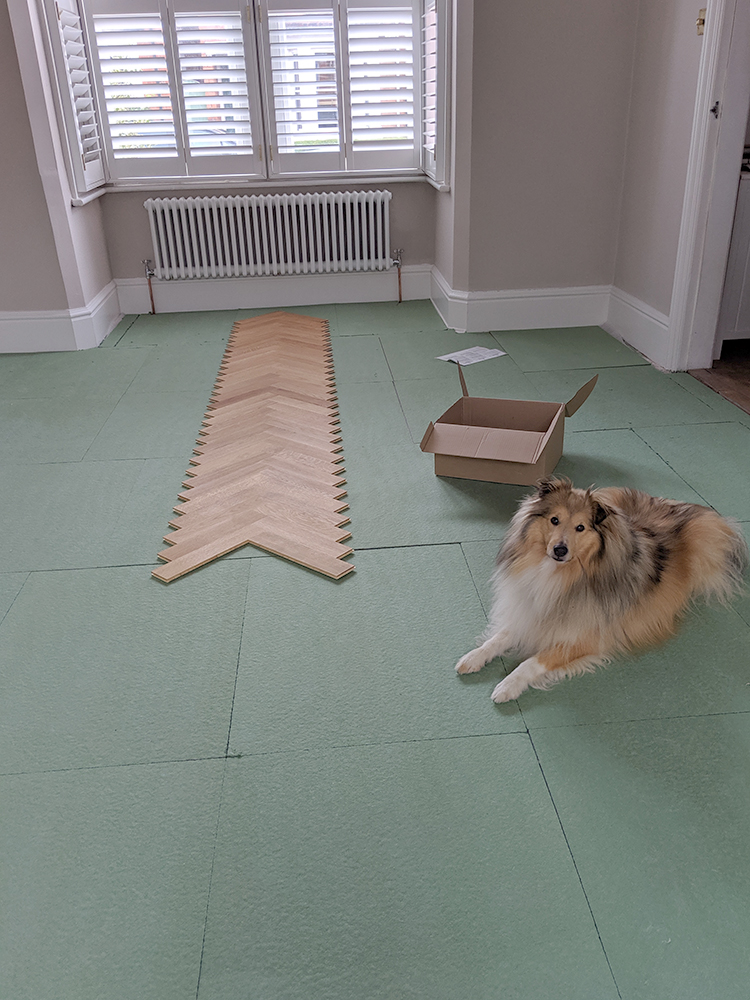
The next step was to find the middle point of the room and decide which way the flooring will run. We decided the midpoint of the bay window would look best and the pattern would run parallel to the longest walls. We drew a straight pencil mark down the length of the middle of the room. This is the point at which all the other planks will come from so this middle row is your most important. It has to be straight!
Step 4: Glue The First Row
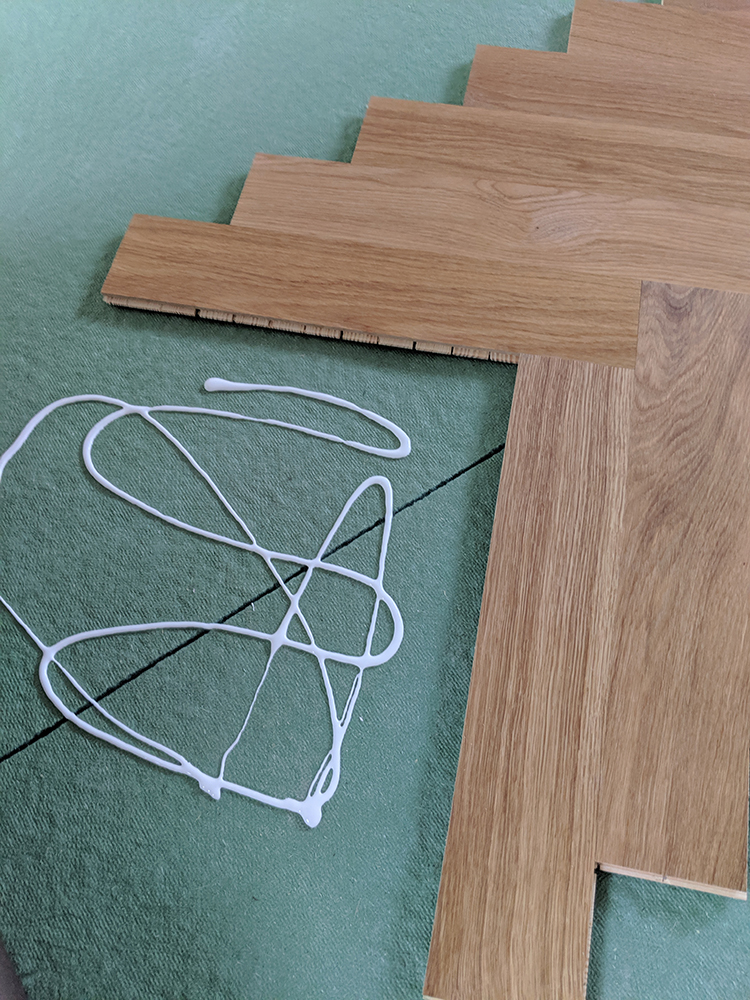
We then started to lay the middle row along our centre line. Once we knew the position was correct, we used PVA glue to ensure the planks stayed perfectly still as we clicked the other planks into place.
**UPDATE: Use more glue than what you see here – the planks really need to be stuck down to that underlay so they resist any movement**
Step 5: Work From the Middle Outwards
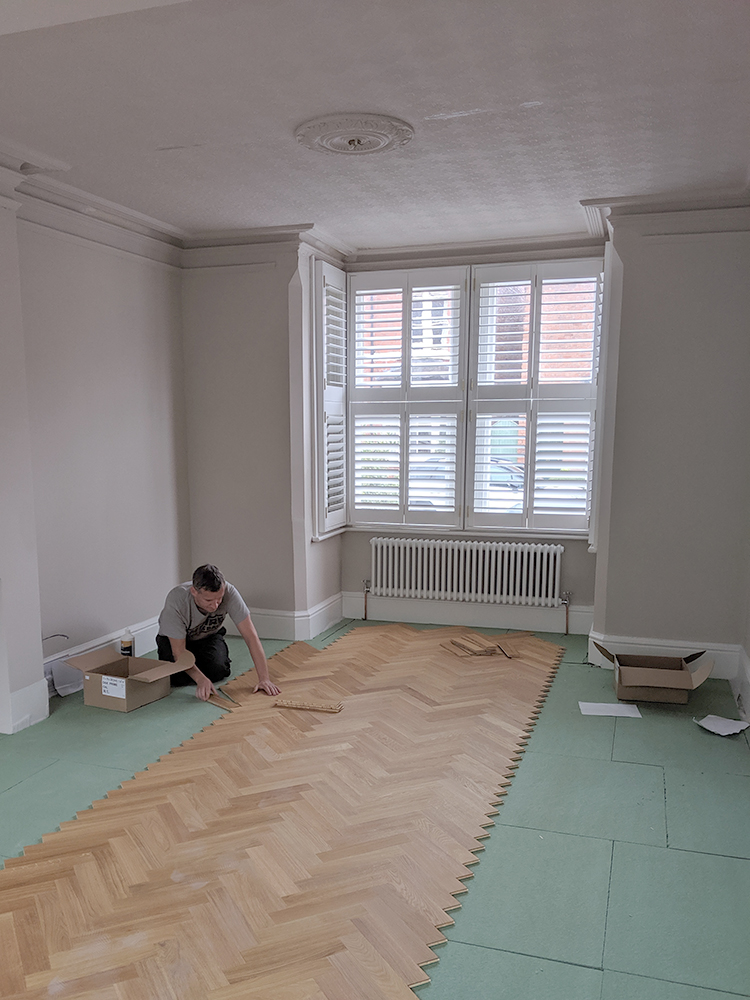
We then worked outwards, one row at a time towards the walls from this middle point, clicking each subsequent plank to form the beautiful parquet pattern. We used glue as we went to ensure everything was straight and sturdy and we used a rubber mallet to make sure all the pieces fit snugly together so there were no gaps.
**UPDATE: When we laid the flooring in our living room (you can see that here), we decided to use glue under every single plank and this has meant we’ve had far less movement on those floors than we have in here. In these spaces, we used more glue on the areas that were high-traffic and less on areas that weren’t and I feel this is a reason we’ve had a few gaps appearing in the dining room and kitchen floors so yes, use plenty of glue everywhere (just be sure to clean any excess immediately from the top of the planks as you work!)**
At this point, I was so glad we’d chosen a parquet with the click installation system because with both of us working on it, the work goes pretty quickly and there’s an immediate sense of satisfaction! And yes, despite the pictures implying otherwise, I was working on one side while Wayne worked on the opposite side – I’m just the one who’s always behind the camera!
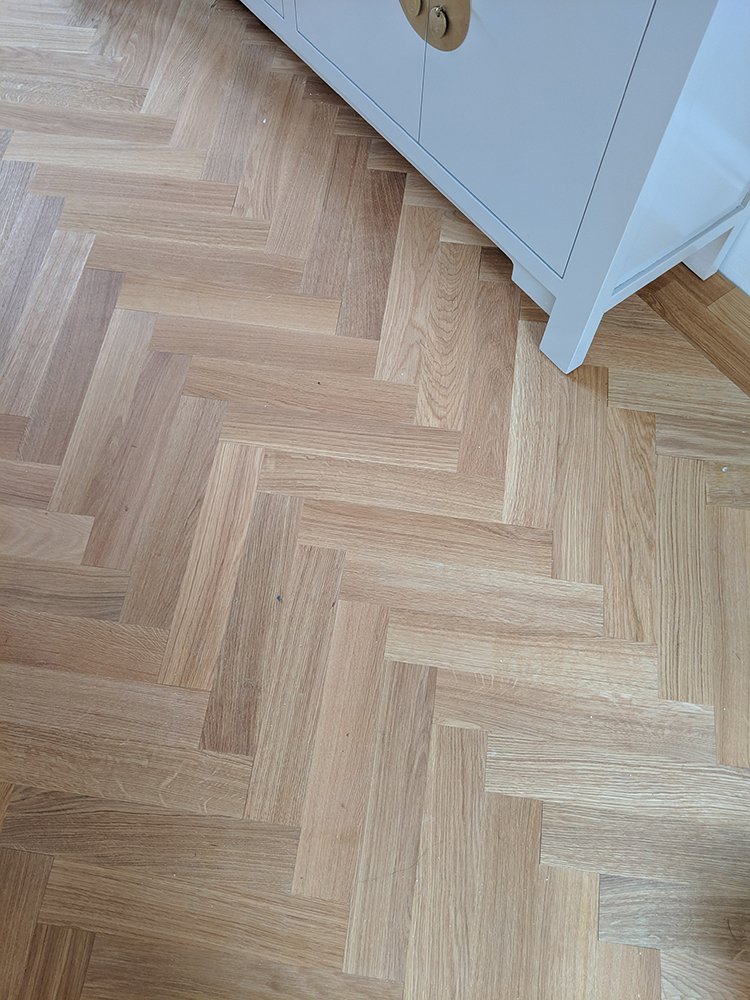
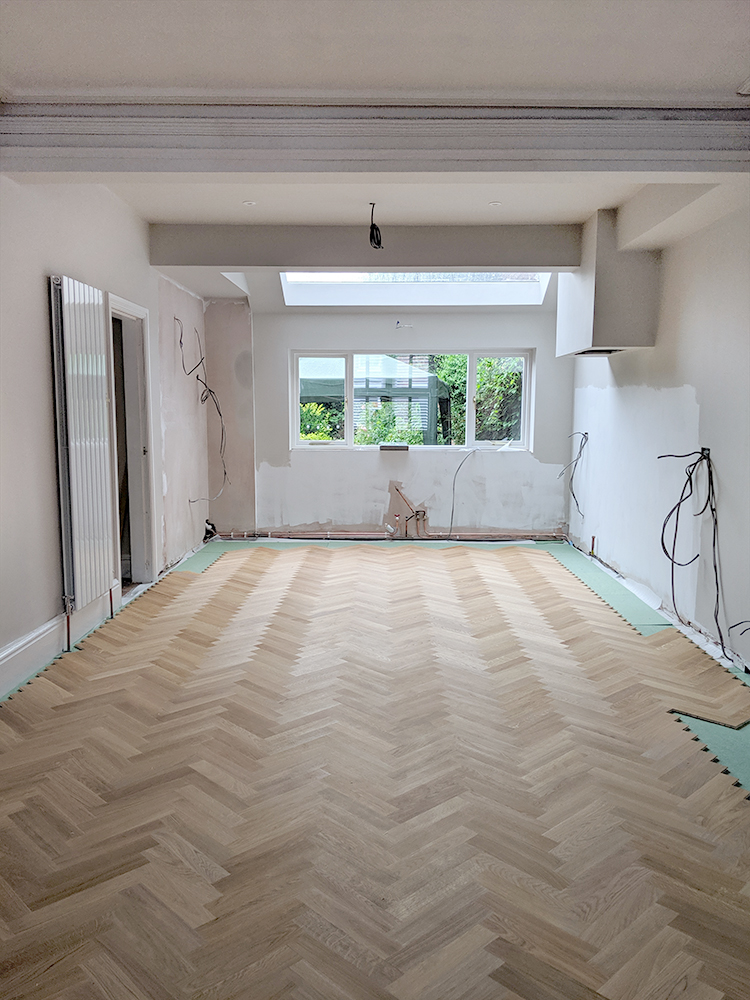
Step 6: Preparing for a Parquet Border
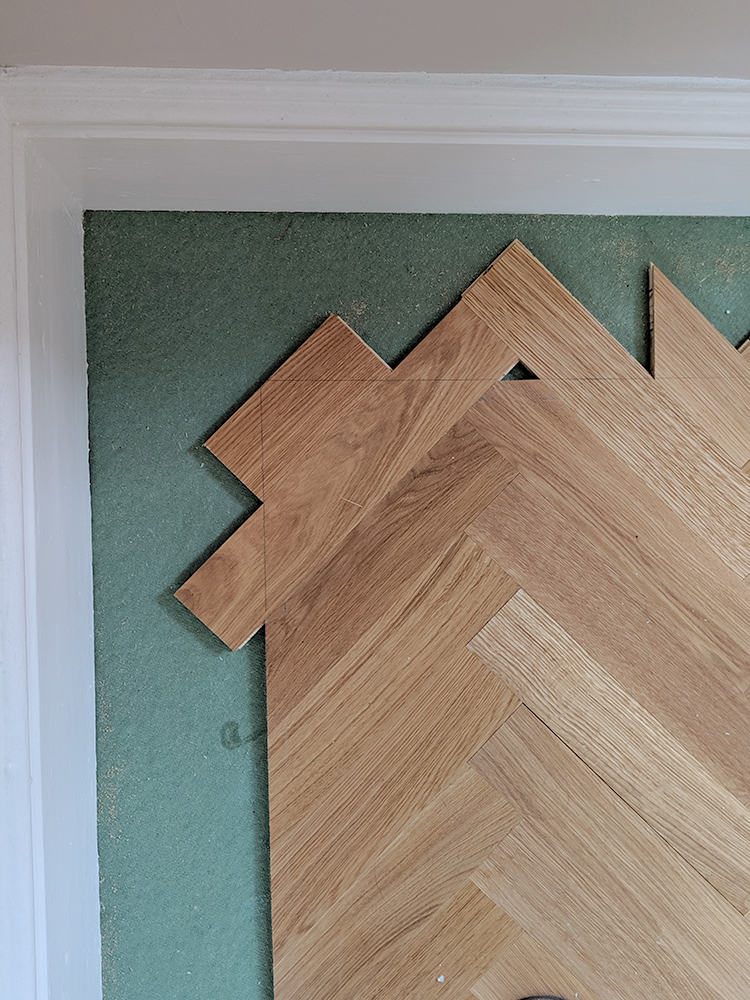
Now, we wanted to match the same layout to what was in the hallway so that included a depth of two planks which ran around the perimeter of the room creating a border. For some areas, the planks ran far enough to the wall that we could simply cut them off to create the space required for the border.
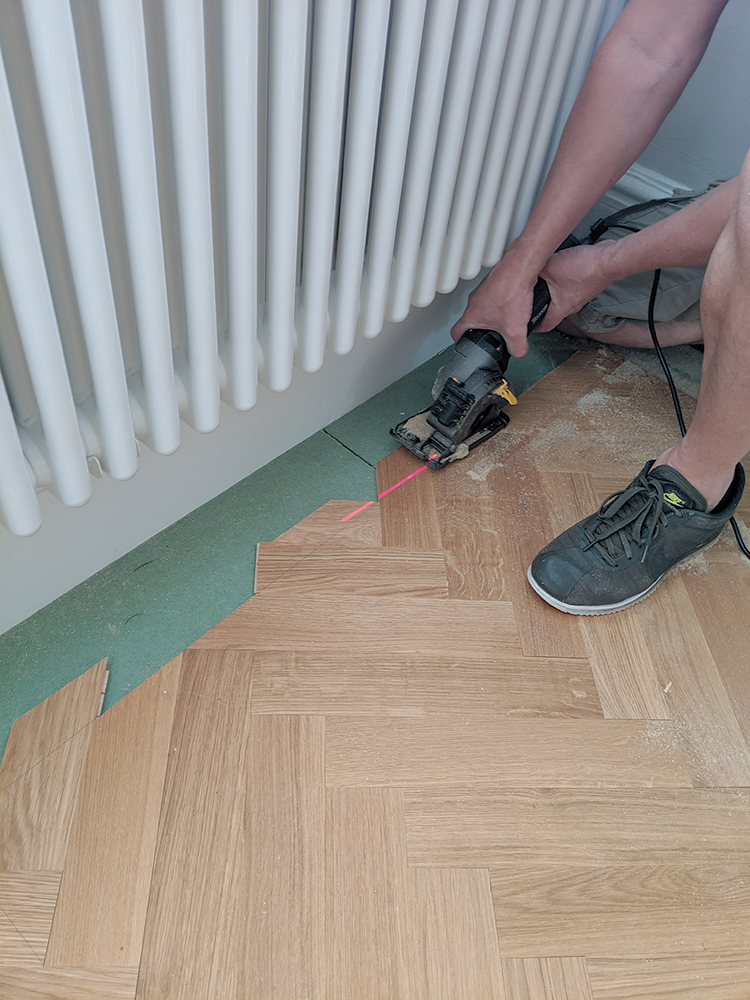
In other areas, where a full plank wouldn’t fit, we used the offcuts to fill in the gaps and then cut them off in a straight line.
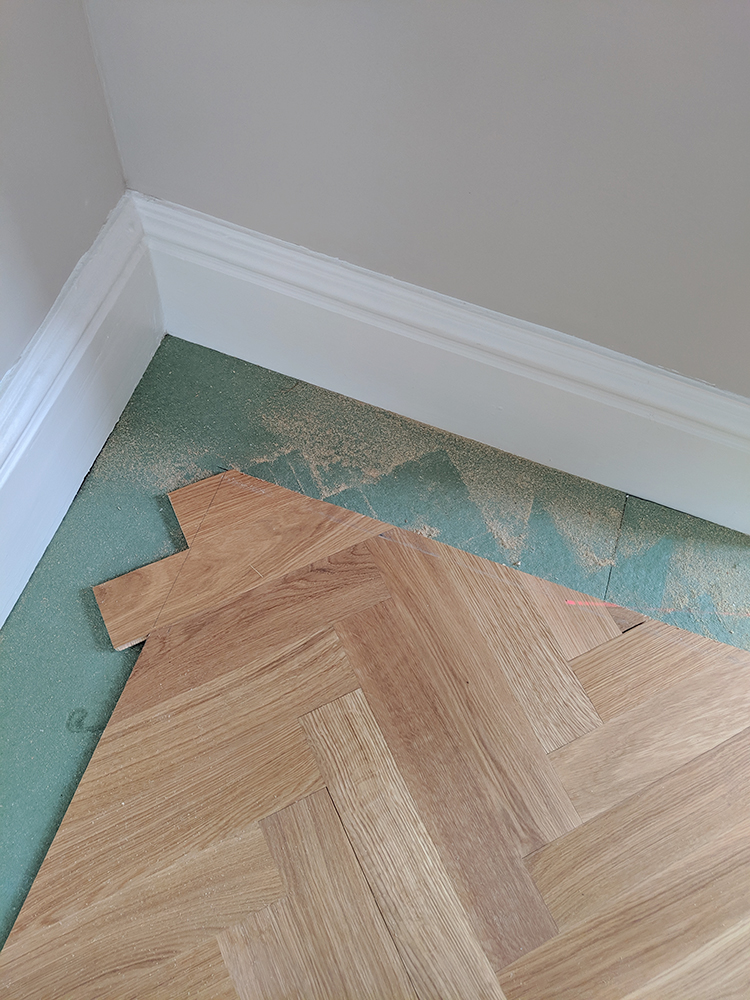
Hopefully, the images explain this better but essentially, we created a pencil line the width of the border plus a 3mm expansion gap across the parquet planks and then used a hand-held circular saw set to 12mm so it only cut the planks and not the underlay beneath. It made the job so much quicker!
**UPDATE So as I said we left a 3mm expansion gap between the skirting boards and the flooring – I did figure if it really bothered me, eventually we’d use trim to cover it up but to be honest, its not really noticeable so we haven’t bothered doing that and its been totally fine so far**
Step 7: Lay the Parquet border
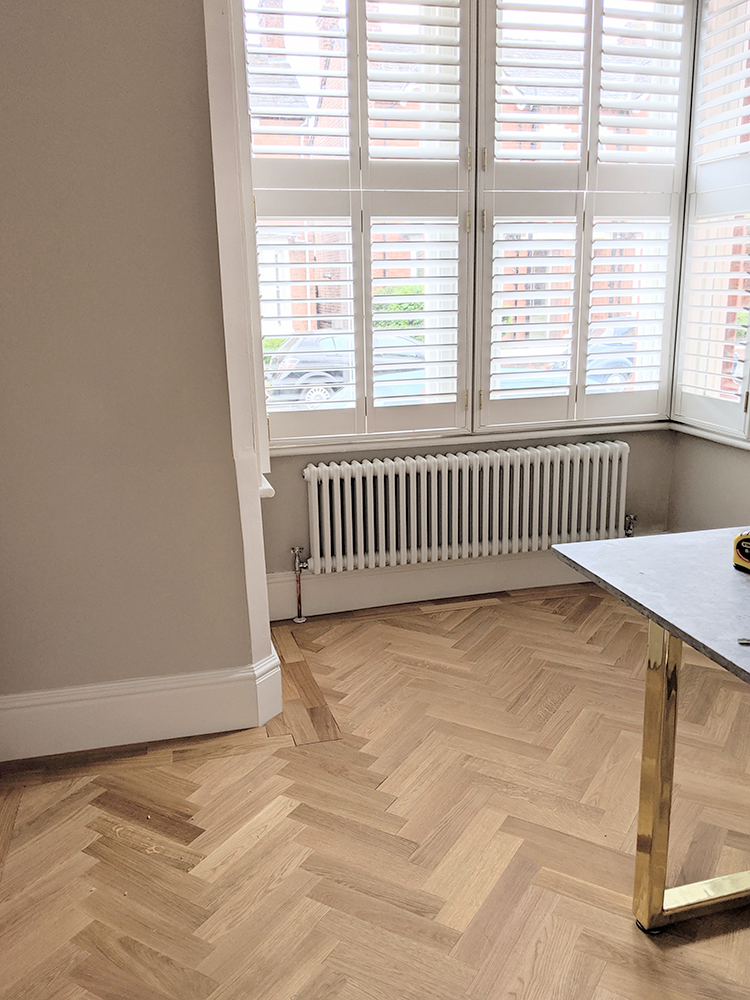
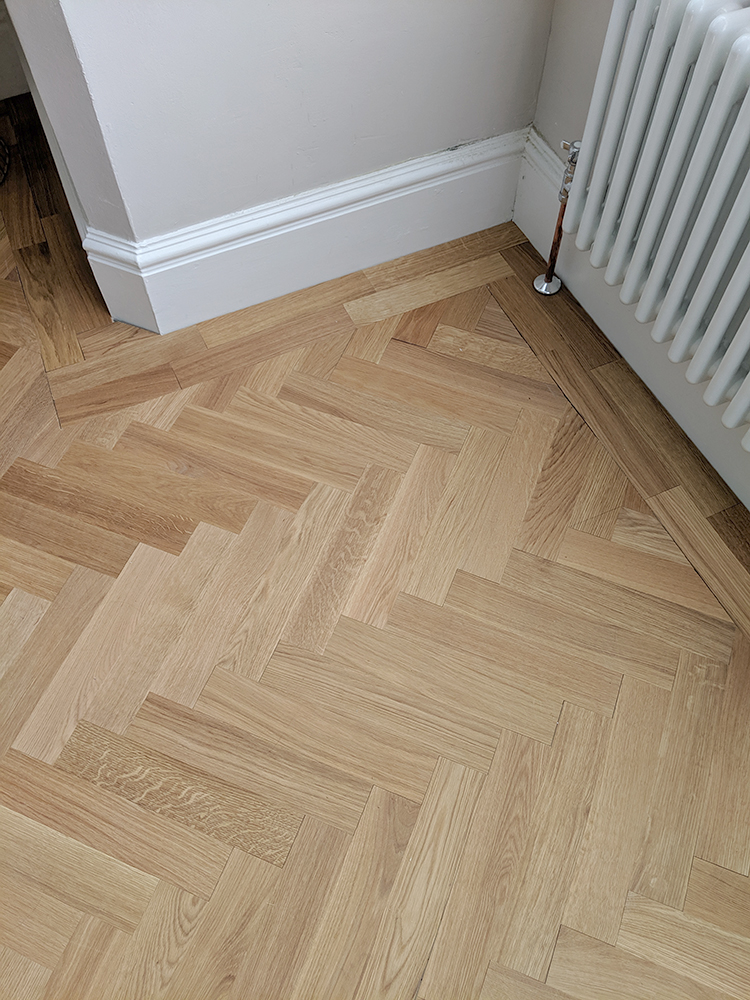
Finally, we laid the border along the entire perimeter of the dining room. Once you have all the cuts in place, then the border clicks in fairly easy. Of course, we had to measure and cut around the radiator pipes and some corners were trickier than others but I think Wayne did a great job here!
In the kitchen above, we have baseboard units on all the walls so we didn’t need to do the borders in those areas (because they’d only be covered!) so just went in far enough so that the flooring would go under the units.
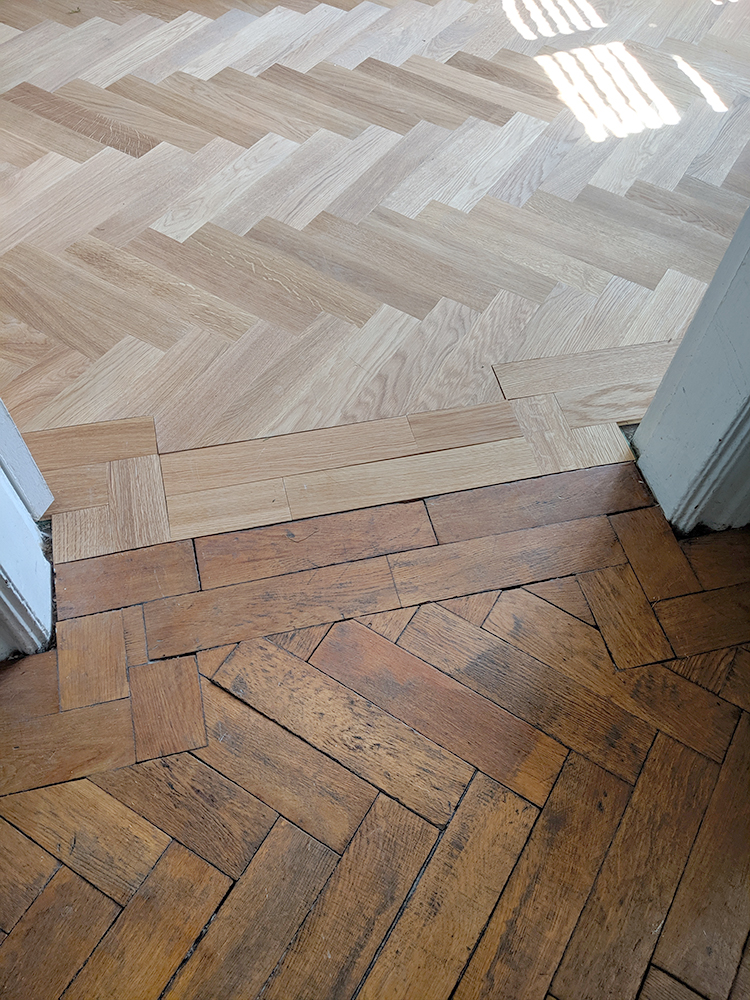
Around the doorway, Wayne mirrored what was done for the original parquet in our hallway so this was a little trickier but it really came out beautifully. I can’t tell you how much joy that detail gives me. At some point in the future, we’ll be sanding and oiling the original parquet to match this flooring as close as we can.
All in, we completed everything within a few days – a full day on Saturday, a few hours on Sunday and then about another full day the following weekend. I genuinely can not be more thrilled with how it all came out and it was so much easier than we thought it would be. The results hopefully speak for themselves!
**UPDATE SEPT 2020: When we laid the flooring, we were told we “could seal over the top but it wasn’t really necessary”. Because we had so much to do, we figured we wouldn’t bother doing this as it was just one less job to worry about. However, I would actually recommend using a sealer over your floors once they’ve been laid. While it’s been fine in the living room, in our kitchen where we have food/oil dropping on the floor, we’ve had a few stains and it broke my heart! So we’re going to have to go back over these areas, give them a light sand and we’ll be sealing all the floors. Once we do that job, I can give an update on what products we used but I would recommend just doing this once you’ve laid your flooring to save you any heartache later!**
The kitchen installation starts this week! I couldn’t be more excited to get this job finished so hang tight and I’m sure I’ll be sharing more soon. In the meantime, hit me up in the comments with any questions! I’d love to know what you think of the flooring!
Disclaimer: We received a discount on our flooring from Luxury Flooring in exchange for coverage on my blog and social media. I only work with brands I love and think you’ll love too and wouldn’t hesitate to recommend their products. Thanks for supporting the brands that support Swoon Worthy.


It looks absolutely amazing, I’d love a dark parquet throughout downstairs as our flooring is getting tired in places now. Might have to throw a few more rugs down though whilst I save up. I can’t wait to see the kitchen going in too. You’ve created such an amazing space. love it.
Ahh thank you Rachel! I’ve genuinely been dreaming about this flooring for YEARS! Now I know how easily we can lay it, you can be sure we’ll be doing using it for more spaces ;) Definitely worth saving up for! xxx
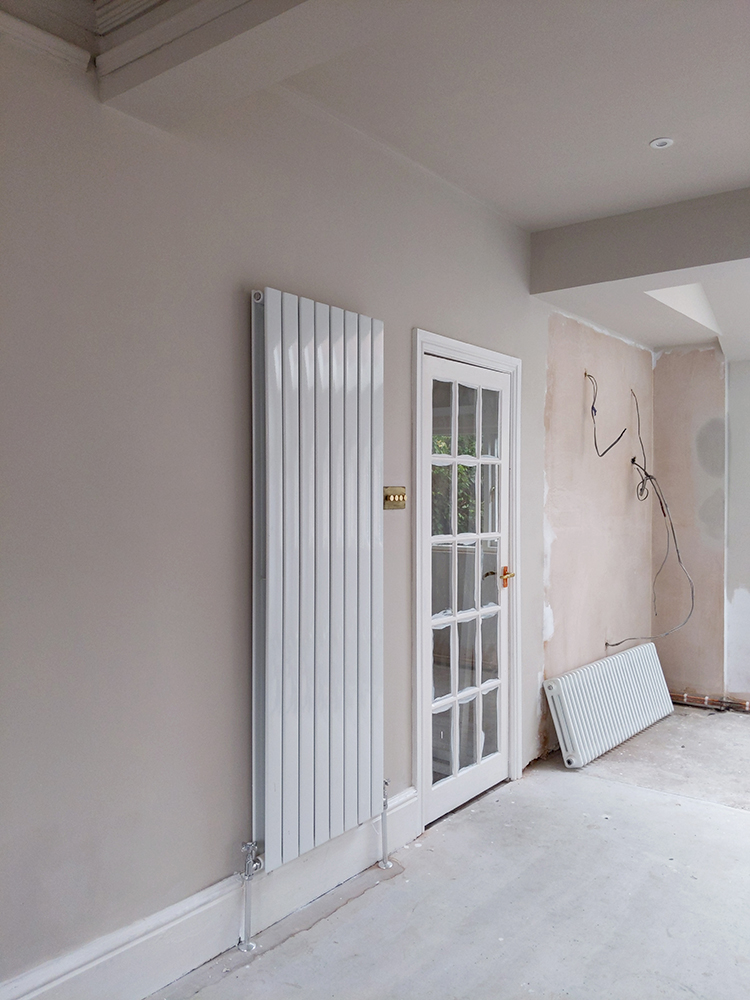
Your new parquet is beautiful. I have a question: in the picture of the kitchen, what is that large fixture attached to the wall just left of the door? Surely not a radiator? Never seen anything like it.
Hi Sheran, yep, indeed, that is a radiator! A bit of a snazzy contemporary flat panel one from Soak.com ;) xxx
What utter gorgeousness! The floor is spectacular. Great job!!
Ahh thank you Anna! We are just so so pleased with it! xxx
The floor is simply amazing, and how great that you and Wayne could do it yourself. I have a question about finish details. In the photo where the new floor meets the hallway, how do you fill in the spaces where the flooring meets up with doorway trim that isn’t squared off. It’s so close, but how do you fill in those little spaces?
Ahh that’s a great question! So as you can see, we’ve not quite done it yet but we’ll be using a wood filler in the same colour as the flooring to fill those little tiny holes in. It’s just too small to put a strip of wood but once the filler is in there, you shouldn’t be able to see those anymore at all :) Hope that helps! xx
I know that you said you received a discount, it would you be willing to share what the cost of your flooring was without the discount?
It looks incredible. You given me the confidence to think about giving this a go myself
So brave to tackle this yourselves – many builders just groan when you mention parquet (and they’re getting paid to lay it). Impressive result!
Hi Kimberley, floor looks absolutely amazing! We are thinking about installing some ourselves. You mentioned leaving a 15mm expansion gap. Have you left your skirting boards in place and laid the floor directly up to them or have you left a gap? Will you be using beading to cover the expansion gap? I don’t like the look of beading, but we don’t want to remove the skirting boards either – help?!
Also, how are the two planks of the edging attached to the herringbone? They can’t be clicked in can they? Do you just butt them up to the edges and glue them down?
Thanks!
Sara
I am also curious as to how you tackled the expansion bit and the baseboards! We’re looking to do a similar floor in our Victorian property.
With your dining room, did you not need to install plywood subfloor over the floorboards?
Just curious, did you glue the border where it butts up to the herringbone? It can’t click in there as it’s been cut? Don’t you get a level difference or movement with the fibre underlay?
Thanks
Will