Oooh get ready for a whinge-y post.  This project tested our patience to the nth degree.

Even just typing out the title of this post makes me feel tired.  Maybe because it just took so much longer and so much more money than we’d ever anticipated to finish the flooring in our kitchen remodel. And it was probably the hardest job we’ve undertaken in this house so far.
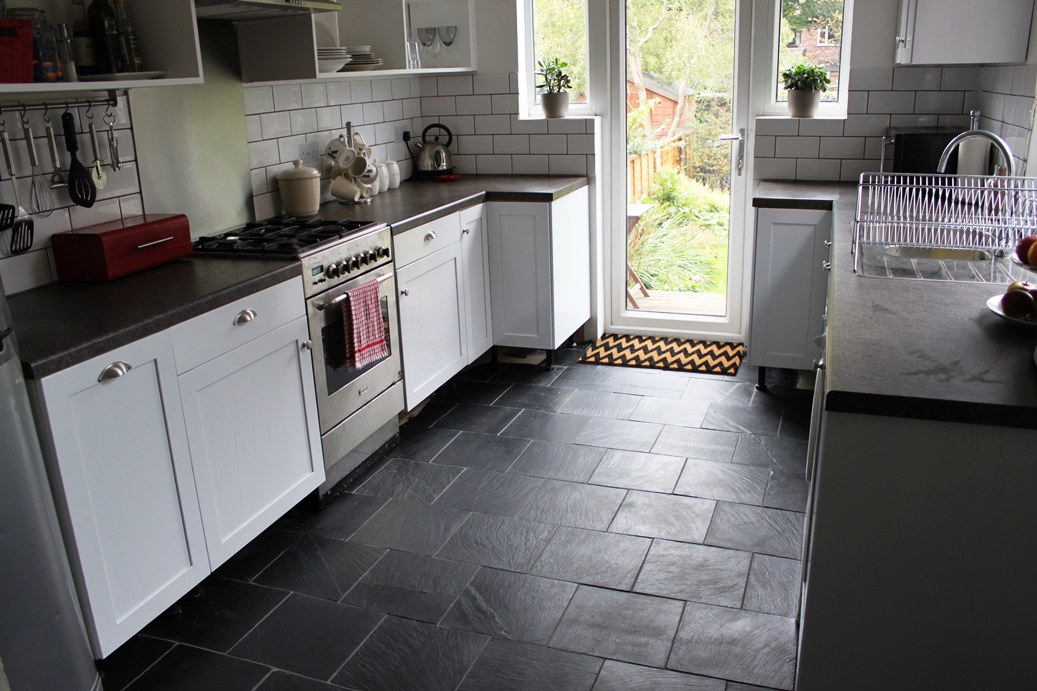
Come and catch up with our kitchen remodel and get a progress report as we finish laying slate tiles with underfloor heating.
The finished floor.

I think the main issue was how many steps there were and how long a wait there was between each subsequent step.  So we would complete one task which would take an hour to complete and have to wait 3 days before we could move on to the next task.  But of course, that would take us into the working week and so it’d be the weekend again before we could move on.  And then another however-much-time of waiting which took us to the next weekend…and so on and so on.  Weeks, people, weeks.

Removing the existing laminate flooring and underlay


saying goodbye to the ugly laminate!
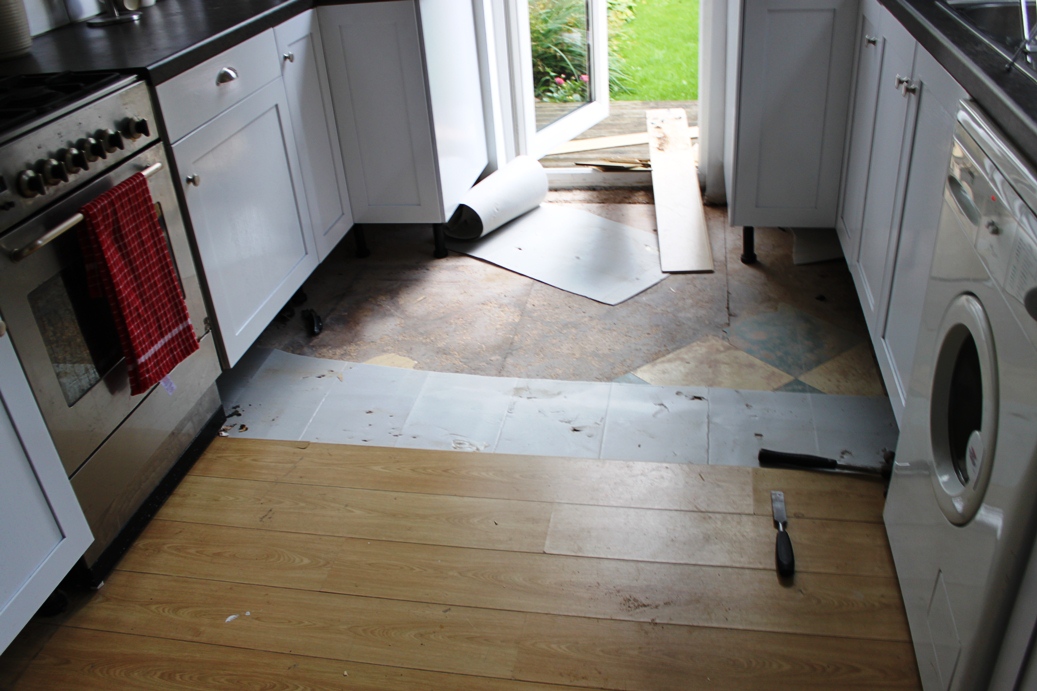
Goodbye ugly laminate!  Don’t let the door hit you in the arse on the way out!

So what I will not do is bore you with every single detail because honestly, it’s just not really worth it.  I have 52 pictures of it (it’s okay, I haven’t included them all).  I really don’t want to talk you through every individual step.  And I’ll be brutally honest with you, I don’t want to do a step by step because a lot of what we did was basically look things up, read a million different blogs, forums, manufacturer instructions… and then watch you tube videos, ask some friends… you get the picture.  We just did what seemed to work each individual step of the way.  This is another reason it took so long.  Because we weren’t ENTIRELY sure what we were doing and, well, we sort of winged it a bit.

Exposing the very old kitchen floor tiles
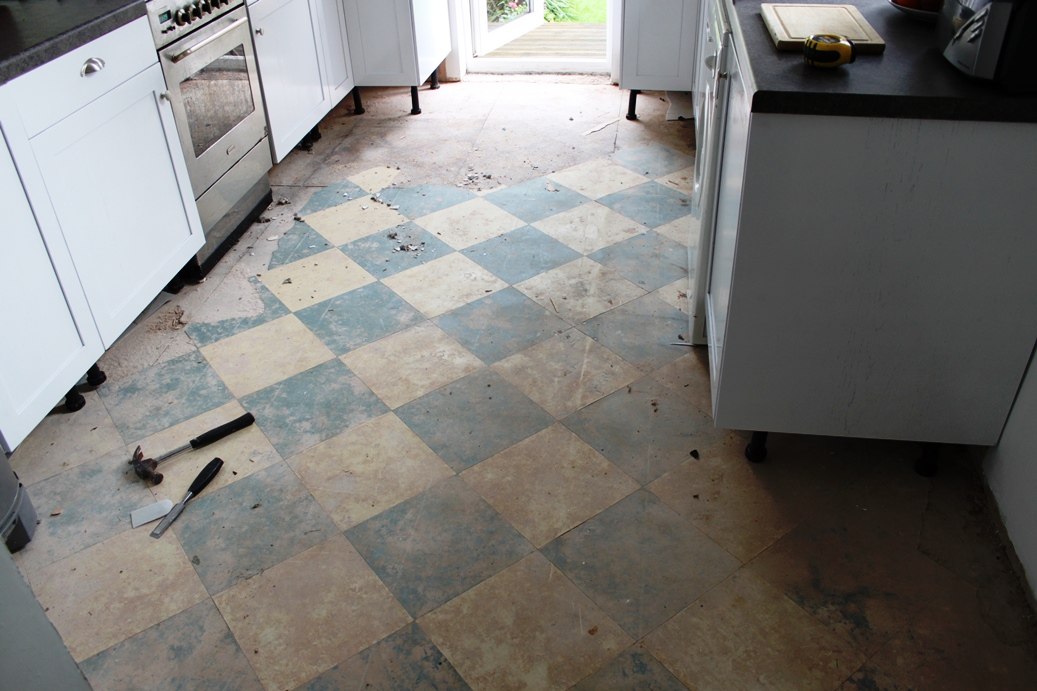
Very very old tile flooring which we didn’t bother taking up.


Adhesive goes down and insulation boards that work with the underfloor heating are set.


Adding the underfloor heating on top of the insulation boards.
The underfloor heating sits on top of the insulation boards.

As they say, there are a thousand ways to skin a cat (who came up with that saying anyway? It’s seriously gruesome) and this is just the way we ended up doing it.  I don’t know that given slightly different circumstances in everything from what we laid the flooring upon to the temperature outside, might give someone else a different result.

Adding a layer of adhesive to the top of the underfloor heating
Another layer of adhesive goes on top of all that – looked a bit like concrete dry.


Preparing the floor for laying slate tiles
And even more to even the floors in preparation for the tiles.

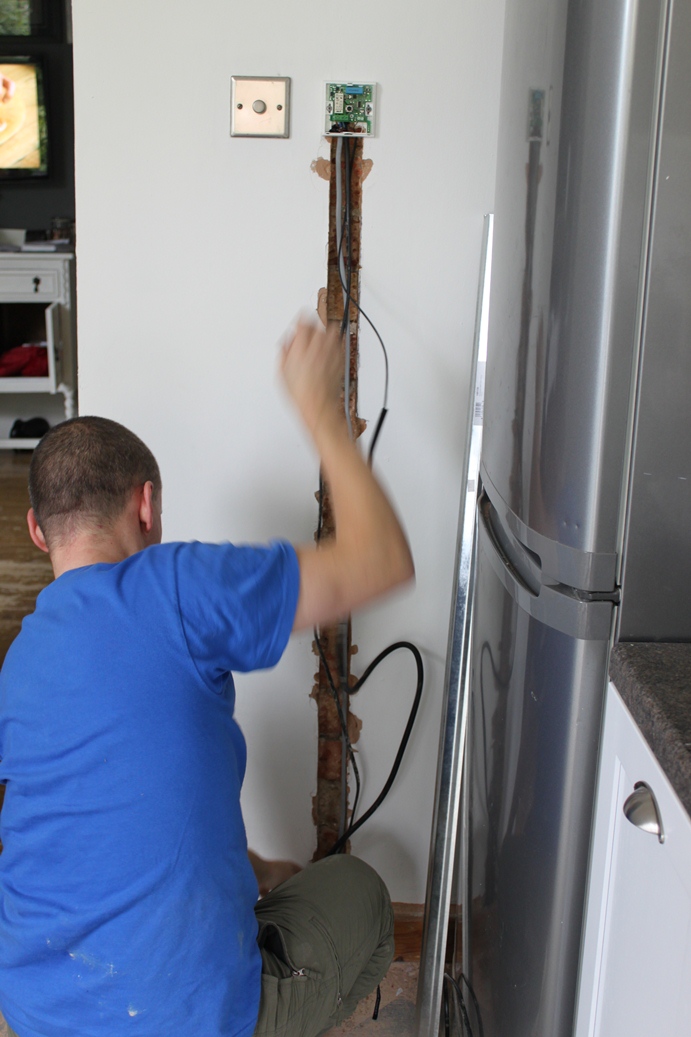
We also had to dig out one of the walls to install the thermostat.  We thought we’d have to call in an electrician for this bit but a bit of research meant that we saved ourselves the cost by doing it ourselves.  Which was a very good thing because the flooring cost a lot more than we’d budgeted for so the savings were welcome!


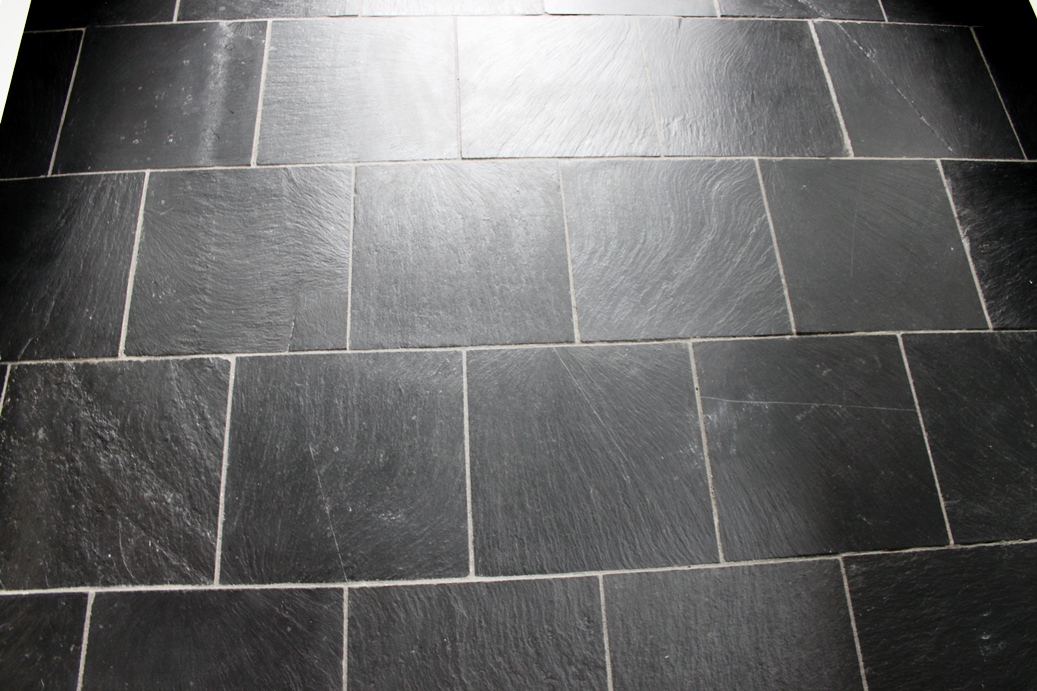
One of the other difficult things about this job was that slate is a natural product.  If you want evenly coloured, perfectly matched tiles, get porcelain.  If you want tiles that are all the same thickness, get porcelain.  If you want tiles that have all the same texture, get porcelain.  If you want perfection, get porcelain.  See where I’m going with this?

Slate is imperfect.  And that is one thing I do like about it.  But holy heck, is it hard work.

sorting the slate tiles in order of thickness
Sorting the tiles into thicknesses.

Trying to lay tiles of varying thicknesses onto a floor that is uneven and then somehow get them to lay straight was an all weekend affair.

Laying out the slate tiles to find the best order
Tiles are laid out in the dining room in the order in which they will go down.

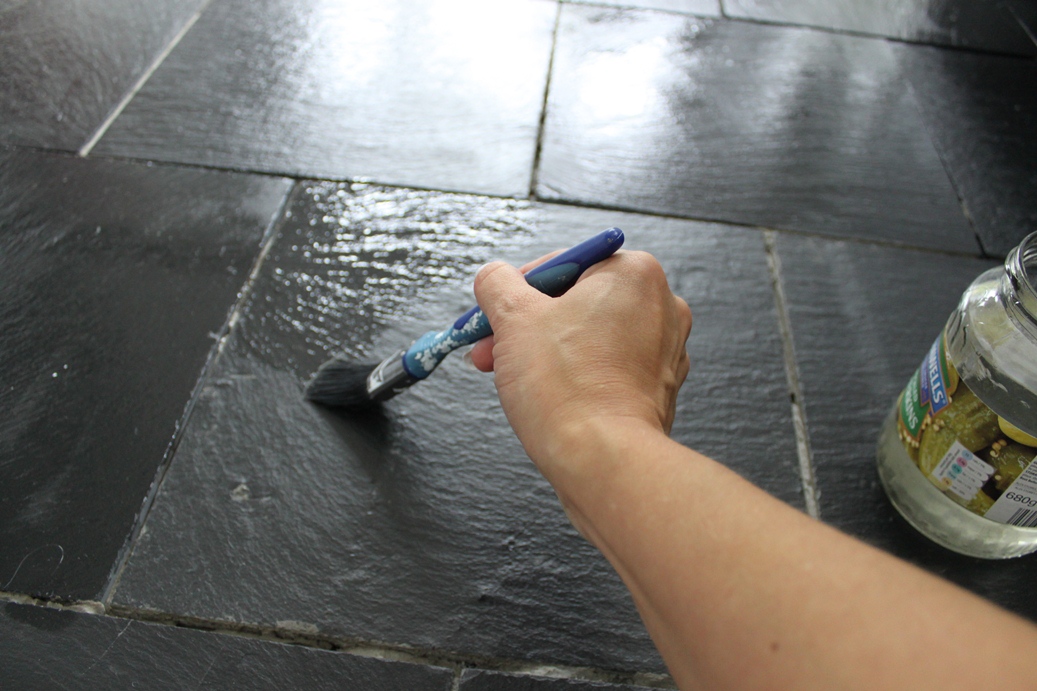
After a very long time going through every single individual tile to see where it best would sit and then laying them, they had to be sealed and protected or they will stain with water, oil, etc.

Adding two coats of sealer and two coats of protector to our slate kitchen floor tiles

Two coats of sealer and two coats of protector before we were able to grout.  With a little brush because that’s how it needs to go on.  And the waiting in between coats. We took turns with this one because it was so tiresome and boring!

Sealing our slate kitchen floor tiles

We had a β€˜no shoes’ policy going for a couple of weeks.

Finally, we were able to grout.  I have no pictures of the grouting process.  Try not to be too upset.  It was probably because I was so tired of this floor not being finished that I didn’t bother.

And then we had to clean (multiple times, the grout is like soot that sits on top) and then seal on top of the grout.

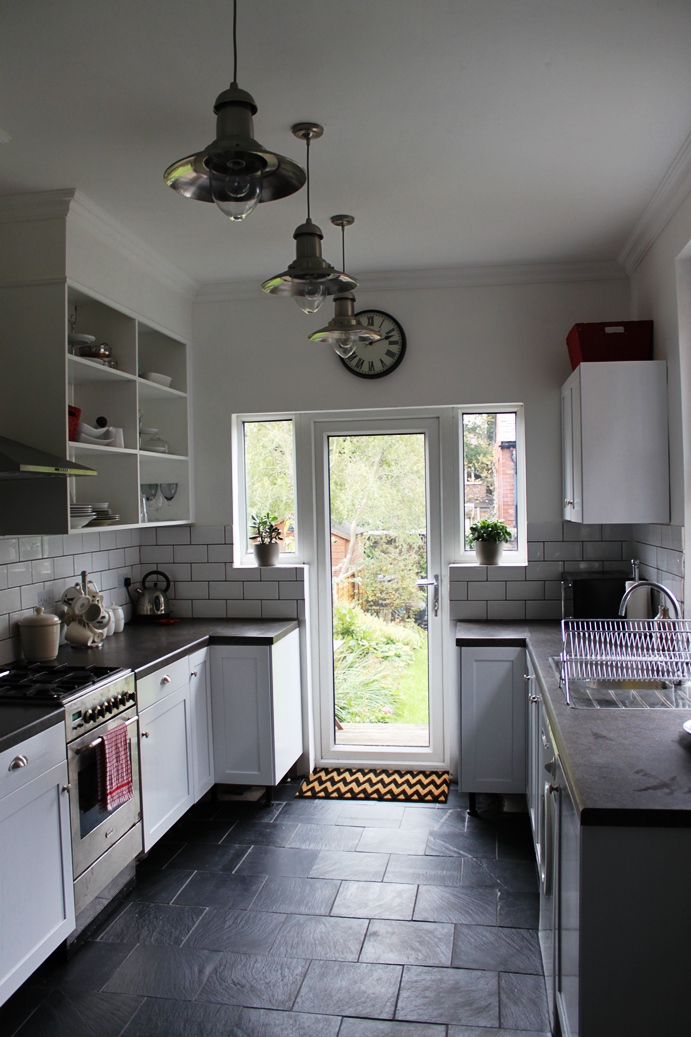
Finally finally finally…. we were left with this.

The finished result after laying our slate tiles in the kitchen.

I have to admit…

The finished result after laying our slate tiles in the kitchen.
It was totally worth the hassle, the time, the backache from lifting these suckers and the sore knees.
We love it.

I even bought a new little chevron door mat from H&M for a mere Β£7.50.  Bargain.

It was too big to fit into that space so we just cut it to size.

Step one.


Step two.


Step three.

Cute no?

Take a look at our kitchen floor after laying slate tiles with underfloor heating
Ta da!

Now, it’s obvious from these pics we are missing something rather important.  And that would be the kickboards (or plinths I think they are called… ya know, the bits of wood that sit between the bottom of the cupboard and the floor).  But we’re going to be matching the kickboards to the butcherblock counter tops – darkly stained wood.  Mmm-mmm.

They will hopefully look rather lush once they go in but I couldn’t resist showing you the floors even though we’ve got big gaping holes under the cupboards.

I like the way that the pattern of the tile (bricked) matches the pattern of the wall tiles.  And I just think they look lovely.  Lovely and uneven and imperfect, like nature should be.

Also, the underfloor heating works a treat!  It’s nice and toasty underfoot which will be welcome over the cold winter.  We don’t have a radiator in the kitchen at all so something to take that edge off was a very necessary indulgence.

An in progress look after laying slate tiles
Still needs a couple coats of paint so apologies for an β€˜in-progress’ picture!

So far, we’ve spent in total Β£1383 (and we are talking EVERYTHING from tile spacers to mixing buckets and everything in between) but Β£500 of that was the flooring.  Yeah.  Worth.  It.

That’s to go from this…

To this…

The finished result after laying slate tiles with underfloor heating

It’s amazing how much you save by doing it yourself.  We could have easily spent ten times that amount if we’d called in people to do it.  Of course, it’d probably have been finished by now but it’s a satisfying journey so I’ve surprised myself with my patience.

If you are new here (and if you are, why hello there you sexy thang! Thank you for joining me!), you can read about my kitchen design influences here, discovering the hidden ceiling here, tearing it down here, putting up the plasterboard and pendants here, plastering here, putting in the cooker hood, the backsplash and tiling here and putting up the open shelving here, installing the crown molding and the risers here and finally painting the cupboards and replacing the hardware here.)   

We are very close now with completing this project.  I can’t wait to get the butcher block counter tops in as they will really warm up the space again – with every scrap of wood/laminate gone now, the kitchen looks a bit cold.  With the wood counter tops stained a nice deep colour in combination with matching kickboards, the warmth will be restored.  Well, that’s the plan anyway.

In the meantime, I think our backs and our bank balance need a little bit of a break!


Pin It on Pinterest

Swoon Worthy
Come and catch up with our kitchen remodel and get a progress report as we finish laying slate tiles with underfloor heating.
Removing the existing laminate flooring and underlay
saying goodbye to the ugly laminate!
Exposing the very old kitchen floor tiles
Adhesive goes down and insulation boards that work with the underfloor heating are set.
undefined
Adding the underfloor heating on top of the insulation boards.
Adding a layer of adhesive to the top of the underfloor heating
Preparing the floor for laying slate tiles
undefined
undefined
sorting the slate tiles in order of thickness
Laying out the slate tiles to find the best order
Adding two coats of sealer and two coats of protector to our slate kitchen floor tiles
Sealing our slate kitchen floor tiles
The finished result after laying our slate tiles in the kitchen.
undefined
undefined
undefined
undefined
Take a look at our kitchen floor after laying slate tiles with underfloor heating
An in progress look after laying slate tiles
undefined
The finished result after laying slate tiles with underfloor heating
Meet Kimberly
undefined
undefined
undefined
Amara IBA19 Winner Home Styling
Vuelio Top 10 2020
undefined
Ad (Press Sample) There are few kitchen products that are considered absolute classics but there is one that I have lusted after for YEARS and that is the utterly iconic @lecreusetuk large casserole pot. 🀩

For nearly a century, Le Creuset has been trusted for its superior performance, lasting quality and iconic design and the enamelled cast iron allows incredible versatility - not only can you use it with just about any heat source (from induction, glass, electric etc), you can also do everything from stir-fry to slow cooking to baking a cake in it and more. 

So, imagine my delight when Le Creuset got in touch to ask if I'd like to shoot their brand new colourway πŸ‘ PΓͺche πŸ‘ in my kitchen. I mean, there couldn't be a more perfect colour match with that juicy coral shade which if you've followed my account for any length of time, you'll know is one of my all-time favourites (not to mention that beautiful soft gold knob! 😍). The matching petite casserole dish and mugs are the perfect companions but you could easily mix and match this colourway with Le Creuset's other designs (Might I suggest the Sea Salt, a soft blue-green which would be gorgeous with PΓͺche). This new juicy summer shade is currently available exclusively at Le Creuset Official. I'd love to know which colourway is your favourite in the range?

#lecreuset #kitchendesign #kitchenstyling #kitchinspo #victorianhome #englishhome
My little neglected makeup/dressing room has had a glow up πŸ₯°

#swoonworthy #beforeandafter #dressingroom #makeupvanity #closetgoals
My new rug can't compete with that belly.

Rug is from @laredoute_uk (not an ad) not that anyone cares πŸ˜…

#kitchendesign
I've really loved making these pretty reusable Christmas crackers! I'm still in the process of finding cute bits for filling them but they'll definitely be a centrepiece for my table this year!πŸŽ„πŸ’•

Suggestions for what to fill them with coming soon!

(By the way, I'm not a skilled seamstress so I'm sure my techniques can be improved but just sharing what worked for me πŸ€—πŸ˜…)

Let me know if this is something you'd try? ❀️

#swoonworthy #christmasdecor #christmascraft #diychristmas #diycrafts #easysewingproject
On 22 October 2022, I married my best friend! I can't believe it's been a whole year (and one day) I've been calling @2nilup my husband πŸ₯° We've been together for 15 years now and I simply can't and wouldn't want to imagine my life without him ❀️ 

#youandmeagainsttheworld #2222 

Photography: @violajayphotography 
Flowers: @primroseavenuefloral 
Dress: @camillawithlove
DIY REFILLABLE CHRISTMAS CRACKERS πŸŽ„πŸŽ‰

I've been thinking about making refillable crackers for so many years now - I just hate the waste the disposal ones create! So I'm so excited I've finally gotten around to starting this project!

I will be sharing more details on how to make them as well as ideas for what to fill them with too so stay tuned for more but in the meantime, what do you think? 

#swoonworthy #diychristmas #christmasdecor #christmascraft #easysewingproject #sustainableliving #ecofriendlyliving
Just wanted to introduce my latest plant baby in my dining room πŸͺ΄

It's from @botanique_shrewsbury and it's a Peparomia (I am probably pronouncing it wrong, I keep wanting to say
GUEST BEDROOM REVEAL 🌟

I decided on a whim, 2 weeks before we were expecting visiting family, that our guest bedroom was in desperate need of a refresh.

Well there's nothing like an impending deadline to light a πŸ”₯ under my πŸ‘ and I managed to clear out the clutter, repaint the woodwork, ceilings and walls and hang wallpaper as well as restyle the room in one week πŸ˜… (Meisha was zero help 😼)

I'm calling it Boho Vintage Victorian Grandma πŸ˜†

This wasn't sponsored in any way but the wallpaper and bedding is from @lauraashleyuk and the paint is @earthbornpaints Peach Baby - everything else I already had!

What do you think of the new look? ❀️

#bedroombeforeandafter #guestroom
#bedroommakeover
#beforeandafter
#bedroomdecor #cottagecore #vintagestyle #victorianhouse #ihavethisthingwithpink #bengalsofinstagram
πŸ”₯JOIN US ROUND THE FIRE PIT! πŸ”₯

ad | One of my favorite things to do in summer is sit around the fire pit in the evenings with a cold beer 🍻 There's just something incredibly relaxing watching those flames and embers crackle, warming yourself up and taking the edge off falling temperatures as the sun sets!

Thanks to @homefireuk they've made the whole process incredibly easy and enjoyable with their Handy Firepit Bundle which include 2 bags of kindling, 2 bags of natural firestarters and 3 large bags of kiln-dried logs πŸͺ΅ for a really great price! 

No more standing around waiting for things to light properly or billowing smoke from wet wood, everything burns beautifully! ☺️ We literally sat around this for hours as the logs last so long, long after the sun set, just chatting and enjoying ourselves! πŸ₯°πŸ»πŸ”₯

Do you love a good firepit in the summer?

#homefire #readytoburn #smokelessbyhomefire #heartofyourhome #logsbyhomefire #summerideas #firepit #gardenideas
San Sebastian photo dump - just a tiny selection πŸ˜„

We have had such a fabulous holiday to Basque Country - our first 4 days spent in the beautiful city of San Sebastian, land of pintxos, stunning architecture and some damn good wine.

#sansebastian #travelgram #photodump
A little kitchen reshuffle today so I thought I'd share πŸ₯°

It's been 4 years since we created this space and it's still one of my favourites β™₯️

#kitchendesign #kitchendecor #kitcheninspiration #kitchenideas #openshelvingkitchen #kitchenstyling
Ad 🩷 Before and after Deck makeover! 🩷

This little decked patio was looking worse for wear after a wet winter but @frenchicpaint came to the rescue with their beautiful Dusty Blush Alfresco Paint, perfect for all your outdoor projects!

The deck has been a few colours over the past few years but this is definitely the most fun and gives the whole space such a tropical vibe - even in Shrewsbury! 🏝️ πŸ¦©πŸΉπŸ˜„

The paint has incredible coverage and was so nice to use - I loved the tools they provided too, especially the oval brush which got into all the nooks and crannies easily!

Let me know what you think of the new colour! 

#frenchicpaint #beforeandafter #deckmakeover #gardeninspiration #gardeninspo #outdoorproject
So on a whim I decided to paint the bedroom pink yesterday πŸ˜…πŸ©·

This room has been neglected for so long as I've wanted to fully redecorate for about 3 years now but there are always other bigger priorities or a lack of time/energy/money so I keep putting it off πŸ™ƒπŸ™ƒπŸ™ƒ (tell me I'm not the only one) but happily this didn't cost a penny as I used what I already had although it did take me the best part of a day!

I went through my paint stash and found that I had extra @coatpaints Percy from when I did the living room early last year -- well I'm not one to let something this good go to waste (honestly this paint is absolutely wonderful to work with and has amazing coverage) and my goodness it's just so pretty in here πŸ₯° I also moved my pink curtains from my office into here and the whole room just glows!

I might actually be able to live with the mural a little longer until the room gets the attention it deserves! Let me know if you like the change β™₯️

*For those who are wondering, it used to be white walls and I had grey curtains! πŸ˜…

#swoonworthy #bedroomdecor #bedroommakeover #bedroomdesign #pinkpinkpink #pinkinteriors
A little photo dump from my recent living room shoot because I still love to dig into the details of a still photo πŸ˜„πŸ’•

#swoonworthy #swoonworthyscents #livingroominspo #livingroomdesign #photodump
ad How to De-stress at Home in 6 Simple Steps 😊

April has been #stressawarenessmonth and so I've teamed up with the wonderful @frenchbedroom to share a few simple tips in creating a cosy sanctuary at home!

One of my favourite ways to add a feeling of comfort and relaxation is with glorious touchable textures and the stunning Mulberry Silk ruffled cushion from French Bedroom not only looks spectacular but feels incredible too! Pairing this with other feel-good fabrics will add depth to your design and will beg you to sink in and unwind 😍

French Bedroom are also now stocking my own home fragrance brand @swoonworthyscents candles, adding another element of calm with scent to your home. I chose No 02 Sunday Morning for my living room with rejuvenating Jasmine and refreshing pine and lemon notes πŸ₯°

Check out my latest blog post for more tips on creating a relaxing sanctuary in your home via the link in my bio!

#swoonworthy #swoonworthyscents #frenchbedroom #livingroominspo #livingroomdesign #calming #aesthetic #cottagecoreaesthetic
Who needs pancakes when you can have Lemon Drizzle Cake with Lemoncello glaze?! πŸ˜‰πŸ‹

I've had such a craving for this cake for a while so figured I'd make it today! This is a recipe from @bbcgoodfood and it's rather gorgeous πŸ₯°

#baking #lemondrizzle #lemoncake #bakewithlove #shrovetuesday
Are you lucky enough to be owned by a cat? 🐈🐾

#bengallove #bengalsofinstagram #bengalcat #bengal #catsofinstagram #catlife
Finally managed to get the gallery wall completed in our hallway!

I couldn't have been happier with @violajayphotography capturing our little intimate wedding in October and knew as soon as I saw the photos I had to print them for our home! I admit, I've never been one to hang photos but it's probably because all we ever had after 14 years together was selfies πŸ˜‚πŸ€·πŸ½β€β™€οΈ I'm so pleased we finally have some lovely shots of us together πŸ₯°

Do you have photos of you/your partner/your family up around your home?? πŸ€”

#gallerywall #autumnwedding #hallwaydesign #hallwayinspo
✨These little vintage copper pans needed some TLC! ✨

After searching for a while for vintage copper pans, I found these on eBay - they looked quite grim on the ad but I knew they could be shined up nicely! A little @barkeepersfriend later (not an ad!) and I'm loving how they look in my kitchen πŸ₯°

Let me know if you like the new addition ❀️

#kitcheninspo #kitchendesign #vintagestyle #kitchenstyling
Oh hey living room, nice to have you back ☺️

I always feel very ready to remove the excess of Christmas decor pretty much as soon as the 26th arrives but I've been later than usual this Twixmas as we've both been unwell the last couple weeks πŸ€¦πŸ½β€β™€οΈ Nevertheless, I've managed to get things packed away and I styled this little faux arrangement today for my coffee table so ya know, small victories πŸ˜„πŸ™ŒπŸ½

#livingroom #livingroominspo #fauxflowers #coffeetabledecor